Installation of a Spectrum colorpicker for BreezingForms

Spectrum is a Javascript plugin written by Brian Grinstead.

Download:

Spectrum can be downloaded for free from its GitHub page.

Installation:

Unzip Sepctrum and install it in the site/includes directory where you will have created two subdirectories "js" and "css". 
Place the file spectrum.js in the "js" directory and spectrum.css in the "css" directory.

Use:

  • In your form, where you want to present the colorpicker, create a text element. Give it a name and remember it.
  • Go to form Advance Options > More Options > Piece > Before form piece > Custom > and paste this in between :
    $this->execPieceByName('ff_InitLib'); // initialisation BreezingForms library
    echo '
    	<style>
    		.colorpicker {display: none !important;} // Contrer un affichage indésirable et inattendu du champ
    	</style>
    	<link rel="stylesheet" href="/includes/css/spectrum.css" />
    	<script type="text/javascript" src="/includes/js/spectrum.js"></script>
    ';


  • Now in the script tab > Initialization Script > Custom > Press "Create Code framework" and paste this in between :
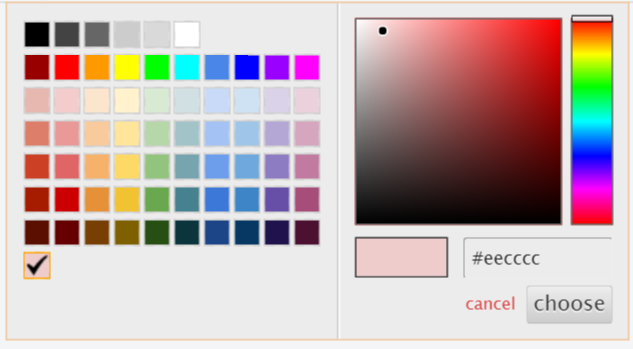
    ff_getElementByName('fieldName').addClass('colorpicker').id = 'myID';
    	jQuery('#myID').spectrum({
    	   // Enter here the desired parameters, separated by a comma, to customize your colorpicker
    	   // for example:
    	   color: 'f00',
    	   showPalette: true,
    	   cancelText: 'Annuler', // Custom text for any language other than English
    	   chooseText: 'Valider', // Custom text for any language other than English
    	    palette:[ // Below the different pellets of the color palette, everything is customizable.
    			["#000","#444","#666","#999","#ccc","#eee","#f3f3f3","#fff"],
    			["#f00","#f90","#ff0","#0f0","#0ff","#00f","#90f","#f0f"],
    			["#f4cccc","#fce5cd","#fff2cc","#d9ead3","#d0e0e3","#cfe2f3","#d9d2e9","#ead1dc"],
    			["#ea9999","#f9cb9c","#ffe599","#b6d7a8","#a2c4c9","#9fc5e8","#b4a7d6","#d5a6bd"],
    			["#e06666","#f6b26b","#ffd966","#93c47d","#76a5af","#6fa8dc","#8e7cc3","#c27ba0"],
    			["#c00","#e69138","#f1c232","#6aa84f","#45818e","#3d85c6","#674ea7","#a64d79"],
    			["#900","#b45f06","#bf9000","#38761d","#134f5c","#0b5394","#351c75","#741b47"],
    			["#600","#783f04","#7f6000","#274e13","#0c343d","#073763","#20124d","#4c1130"]
    		],
    	});
     

You can find all the options available on the plugin's documentation page with an overview of each one

A more complete tutorial (in French) with examples can be found on this page.

Writen from Eddy Van Hoeke (www.breezingforms.eddy-vh.com).

Add a comment

Age restriction

Here it is explained how to allow only people of legal age to submit the form.

In this example, it is assumed that "%d/%m/%Y" date format is used.

To make it able only for people of legal age to submit a form follow these steps:

1) Create a "Calendar" element with format "%d/%m/%Y".

2) Go to Properties of that calendar element, scroll down and in the "Validation" section check the "Required" checkbox, set Type to "Custom".

In the code area that appears below paste the following code:

function ff_CalendarElementName_validation(element, message)
{
   // Checking if the entered date is in right format
   var pattern = /[0-3][0-9]\/(0|1)[0-9]\/(19|20)[0-9]{2}/;
   if(pattern.test(element.value))
   {
      var date_array = element.value.split('/');
      var day = date_array[0];

      // Attention! Javascript consider months in the range 0 - 11
      var month = date_array[1] - 1;
      var year = date_array[2];

      // This instruction will create a date object
      birthDate = new Date(year,month,day);

      if(year != birthDate.getFullYear())
      {
         return message == '' ? "Date isn't entered in the right format.\n" : message;
      }

      if(month != birthDate.getMonth())
      {
         return message == '' ? "Date isn't entered in the right format.\n" : message;
      }

      if(day != birthDate.getDate())
      {
         return message == '' ? "Date isn't entered in the right format.\n" : message;
      }
   }
   else
   {
      return message == '' ? "Date isn't entered in the right format.\n" : message;
   }
   
   var now = new Date();
     
   var dobYear = birthDate.getFullYear();
   var dobMonth = birthDate.getMonth();
   var dobDay = birthDate.getDate()

   var age = now.getFullYear() - dobYear;
   var ageMonth = now.getMonth() - dobMonth;
   var ageDay = now.getDate() - dobDay;

   if (ageMonth < 0 || (ageMonth == 0 && ageDay < 0)){
       age = parseInt(age) - 1;
   }

   if (age < 18) {
       if (message=='') message = "Only persons of legal age can submit this form.\n"
       ff_validationFocus(element.name);
       return message;
   } // if
   else if (age  >= 18){ 
       return '';
   }
    
} // ff_CalendarElementName_validation


NOTE: In the code above you have to replace "CalendarElementName" with the name of that calendar element in your form.

This way, an error message will appear after clicking on the submit button if the age of the person isn't above 18.

Therefore, only users of legal age will be able to submit the form.


Add a comment

LIMIT MAXIMAL NUMBER OF FILES TO UPLOAD

Here it is explained how to limit the number of files to upload when Allow multi HTML5/Flash uploads checkbox is checked.

Please follow these instructions.

Go to Properties of the "File upload" element in your form and in the Validation section check Required checkbox. Then select Custom as the validation type and in the code area paste in the following:


function ff_uploadelementname_validation(element, message)

{

var children = jQuery('.bfFlashFileQueueClass').children();

var len = Number(children.length);

console.log(len);

if ( len > 3) {

if (message=='') message = " Too many files uploaded.\n"

ff_validationFocus(element.name);

return message;

} // if

return '';

}


NOTE: In the code above replace uploadelementname with the Name of your File upload element.
This is the example where 3 is the maximum number of files to upload. 

In the following line of code, replace 3 with the maximum number wanted.

That will limit the number of files that can be uploaded.

If a user tries to submit the form with too many files uploaded an error message will be shown and won't be able to submit the form until he reduces the number of uploaded files to less or equal to the maximal.


Add a comment

Top 5 Joomla!® 2019 Forms Extensions

Though we develop our own popular Joomla!® forms extension BreezingForms, it is always good to know that there are alternatives. I would like to introduce you some of the other major Joomla!® forms extensions that I think are definitive worth to have a look at 2019-

1. JSN Uniform

JSN UniForm is a Joomla! Form extension which helps you create forms quickly and easily - from normal to complex.
Moreover, you can efficiently manage all the submissions as the administrator. The configured form can be published in any part of the website including: in article content, in the main body area and different module positions.

JSN Unifiorm

2. RSForm

RSForm! is a general Joomla! form builder, flexible and easy to use. As a mature extension, RSForm!'s quality is expressed by the large number of Joomla! sites that are using it - well over 5000, since its release, back in 2007.

RSForm

3.Xpert Contact

Most module ajax based contact for for Joomla. You can create as many field as possible from xml and create different form for different page.

Xpert Contact

4. Proforms

Its advantage is the ease-of-use but also provides an app system to get enhanced. The apps are provided by the developers themselves and are mostly commercial. Unlike BreezingForms, support is limited on domains, keep that in mind if you need it for plenty of installations across different domains.

ProForms

5. Form Maker

Form Maker is a user-friendly form builder with drag and drop interface, which allows easily move form fields for simple management. This will help to align form fields next to one another or arrange them in sections.

Form Maker

There are plenty of other form extensions for Joomla!® available but the collection above are definitely the best ones available at this time.

Add a comment

CHANGE FIRST DAY OF WEEK IN CALENDAR ELEMENT

 CHANGE FIRST DAY OF WEEK IN CALENDAR ELEMENT


Here it is explained how to make Monday the first day of week in Calendar element with date format "%Y-%m-%d"

Go to form Advance Options > More Options > Scripts > Initialization Script > Custom > Press "Create Code framework" and paste this in between :


Calendar.setup({
        inputField     :    "ff_elem1717", 
        ifFormat       :    "%Y-%m-%d",
        button         :    "ff_elem1717_calendarButton",
        align          :    "Bl",
        singleClick    :    true,
        firstDay: 1
    });


The whole code will look like this:

function ff_formName_init()
{
Calendar.setup({
        inputField     :    "ff_elem1717", 
        ifFormat       :    "%Y-%m-%d",
        button         :    "ff_elem1717_calendarButton",
        align          :    "Bl",
        singleClick    :    true,
        firstDay: 1
    });
} // ff_formName_init


NOTE: To make this work for your form you have to find your calendar element ID and replace ff_elem1717 with it. Also, you have to replace ff_elem1717_calendarButton with your calendarButton ID. Also, formName will be the name of your form.

The first day of week can be set to what is suitable by changing firstDay: 1 to another value.

Add a comment

Special Offer

Sale! All subscriptions at a special price!

Includes prio support, all of our current and future Joomla!® extensions and Joomla!® templates for the duration of your membership.

Get it from here

3rd Party Discount - 25% Off

We help you to keep your costs under control. If you are a new member and purchased a form building tool from a different form vendor, then you'll get a 25% discount on our subscription plans.

How to receive the discount:

Send us a quick email to sales@crosstec.org with a proof of purchase (for example a paypal receipt), await payment instructions and enjoy your membership!