")


The base of all activity is the data source. You may use the built-in Data Storage, BreezingForms (as of version 1.7.5 pre-release) or implement a custom data source using the „types“ interface (PHP programming required).
First, you add all possible fields in your desired source, then defining all of your required views, where each view communicates with the source and manages its outcome (displaying data, serving forms, sending email and observing permissions).
In the following, we will first introduce all available items.
Data Storage
The built-in Data Storage is a simple way to define fields that you can use later in your views. You basically add a name and title for the storage and then adding the fields one by one. Each field consists of a name, title and group information. If the field is a group, then you need to define the structure of that group. Later, in your view, a group might be a field of type checkbox, radio or multiple select list.
By clicking on a field's name or title, you may edit its value. Click on „edit“ will open a textbox with the group definition, if required.
The group definition follows the pattern:
Label 1; value1
Label 2; value2
Label 3; value3
Where „Label 1“ is what you see on the screen and „value1“ is what will be transferred as value into the data source.
The order of the fields has an impact on the order in the content-, editable- and email templates, as they will appear in the same order (excluding the list definition, more later in „Views“).
Once a Data Storage has been created, it will be available to serve the views. Don't forget to publish the Data Storage in order to select it in the view!
A Data Storage may be edited at any time but be aware that if you delete a field, the data behind that field will get lost.
Internally, the Data Storage is represented as database table (database table with the Joomla!® DBprefix + name of Data Storage).
The interesting part is, that you may transform each field type across your views. In one view, a group might be of type radio group while in another view it may be of type checkbox group. You can even lead out fields to update records but use them in different views.
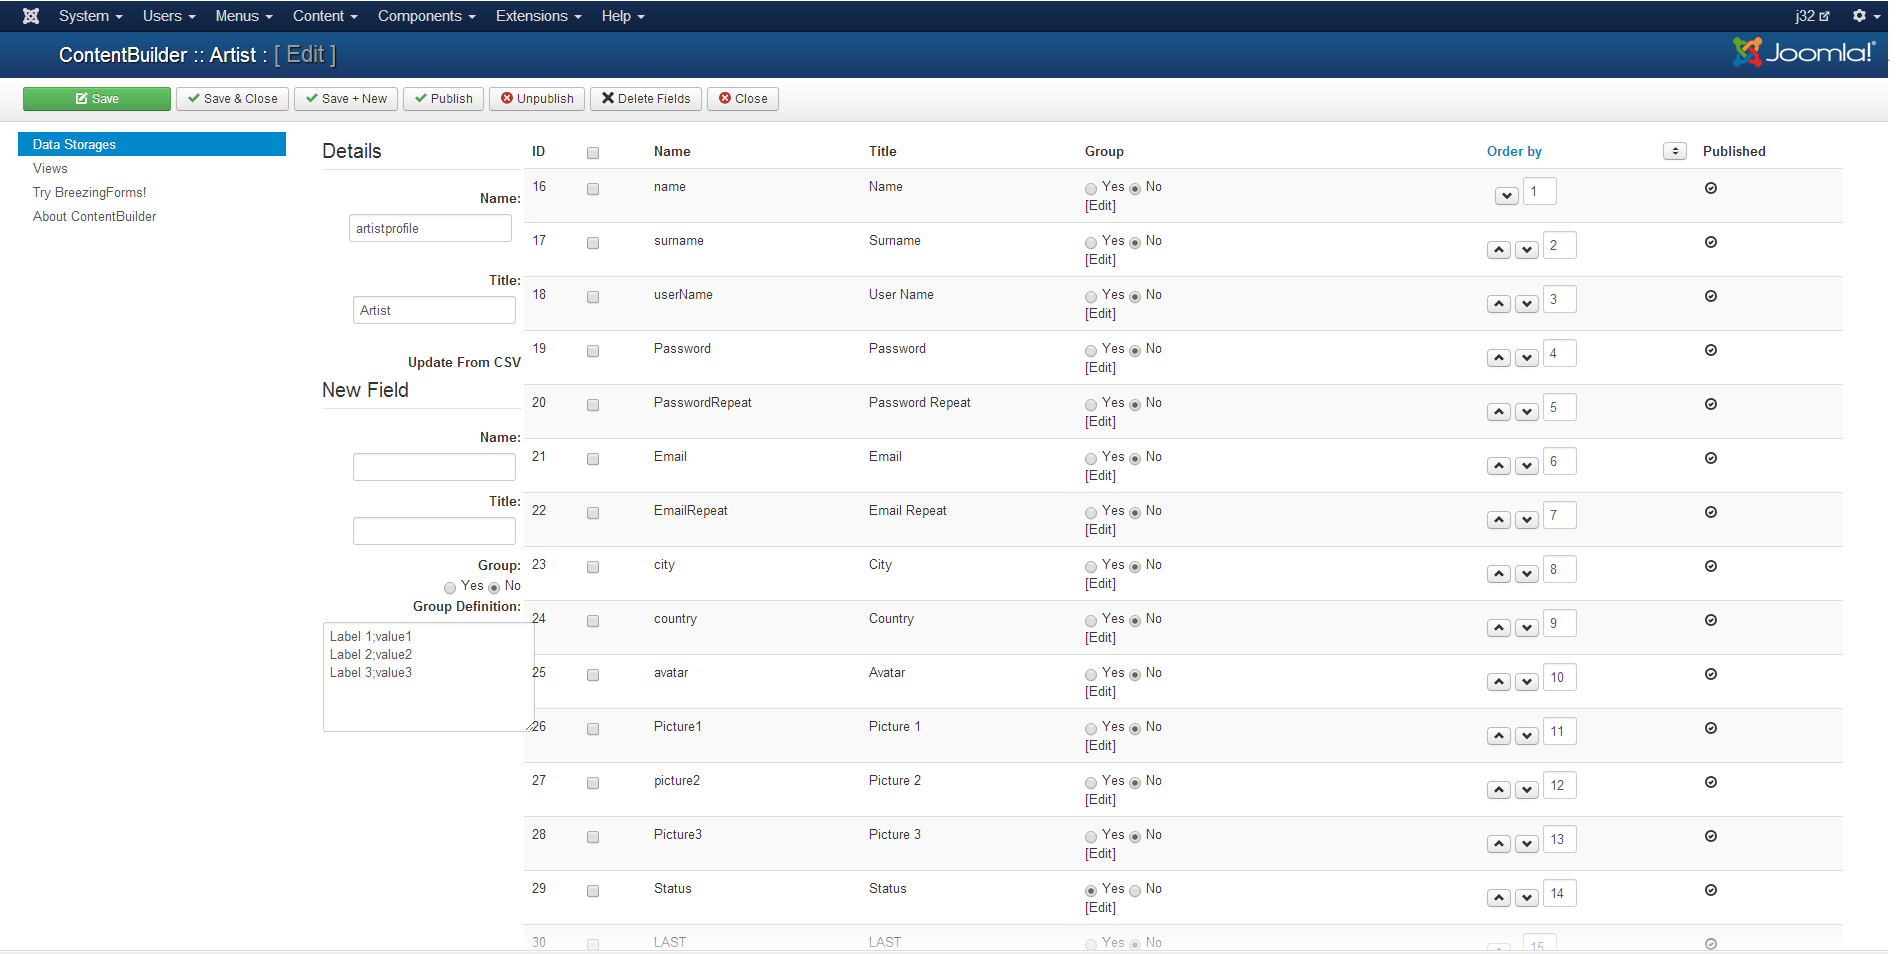
The built-in Data Storage with some fields for profile data
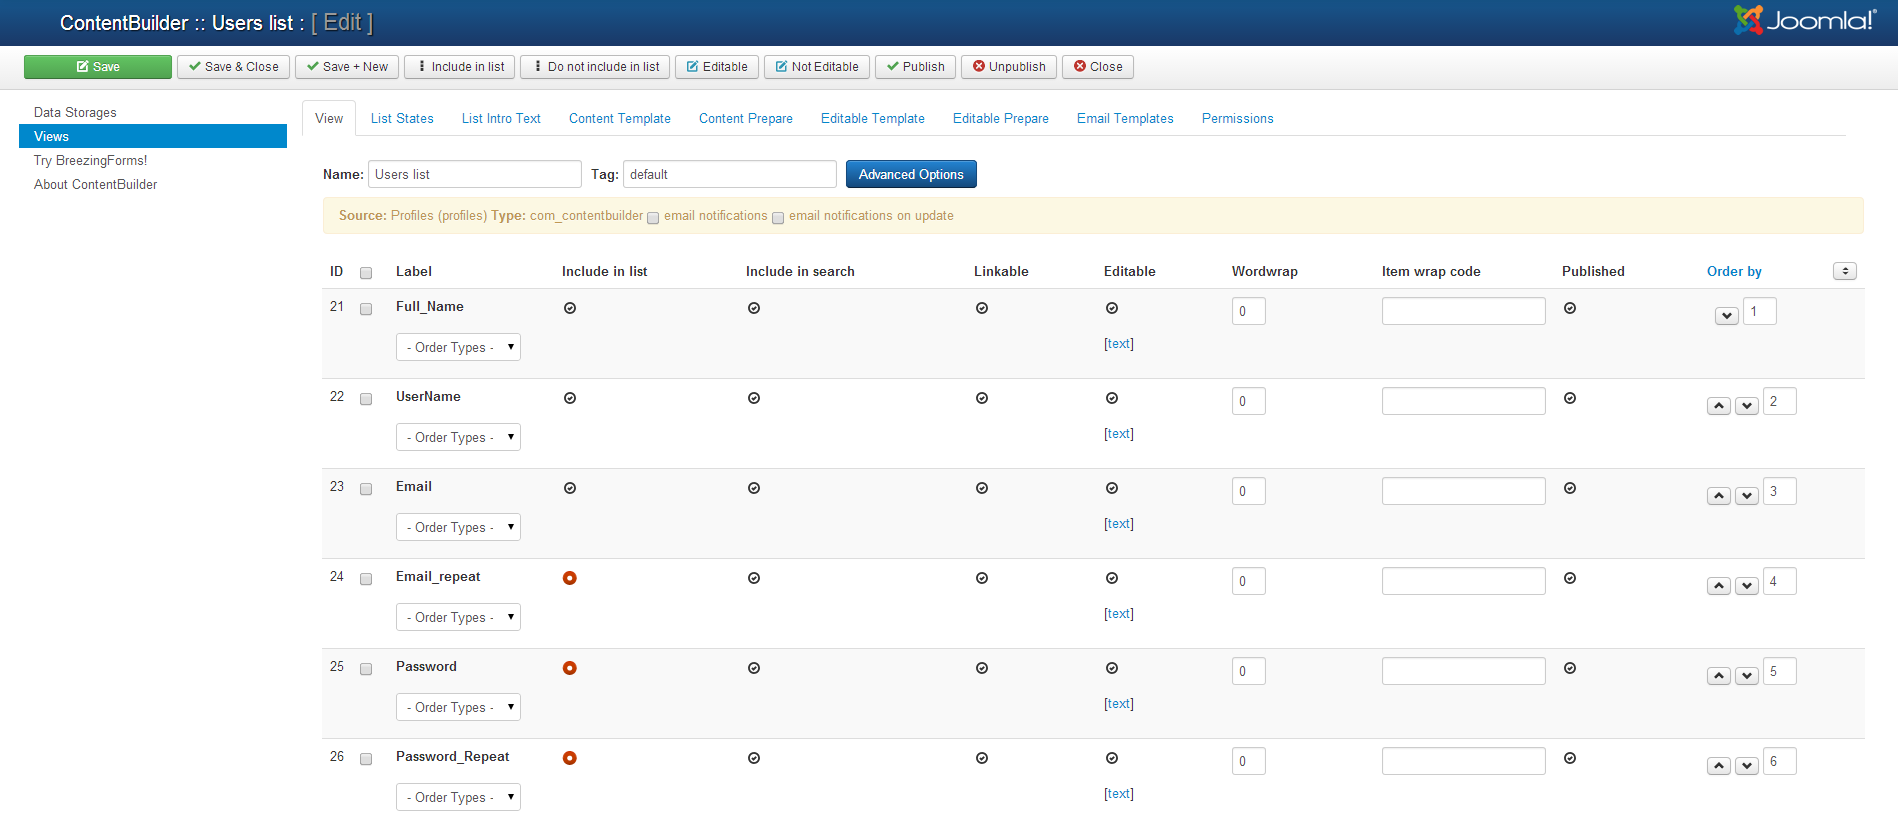
Views
A view in ContentBuilder is a functional representation of the data source (in our case the DataStorage). It is divided into 9 tabs:
- „View“: The command central for the whole view setup. Here you may setup things like:
- What fields to show in the list and details?
- What fields should be searchable from the list?
- What fields should be editable?
- What type for each editable field? (for example text, textarea, select lists, uploads, etc.)
- Where to display the view? (backend/frontend/both)
- What administrative columns to show in the list? (for example record id, article id, actions, publish state, etc.)
- Overriding the titles of each field.
- „List Intro Text“: A descriptive text that shows on top of the list. Html is allowed.
- „List States“: Up to 10 positions to make custom states possible. You may either add a title for each state, select a color and choose a list action plugin to perform an action on the records selected in the list. List action plugins can be either offered by crosstec.org or from the community and are regular Joomla!® Plugins.
- „Content Template“: The content template should provide the layout for the content of this view. Content can be either a details page from the list or a Joomla!® content item (article).
The content template setup provides the following settings: - „Create Articles“: using „no“ will not generate content items (articles) based on the records from your data source but use the template only for details of a list.
- „Delete Articles“: if selected, all articles associated with the deleted record(s) will be deleted as well.
- „Title Field“: what field out of your view should act as title?
- „Default Category“: if there are new records, the selected Joomla!® category will be used for the generated article (the category can later be changed in the settings of an article from within the list view). If you assign a list with a Joomla!® Menu item, you may also specify different default categories for each menu item.
- „Default Language Code“: Select the language the record and article should be associated with on record/article creation. Choose „Any“ to display in all languages.
- „Ignore default and use active language“: If selected, the record/article will be associated with the current language of the submitter.
- „Default Publish Up (Days)“: The amount of days a record/article is allowed to be published.
- „Default Publish Down (Days)“: The amount of days AFTER publish up, the record/article should be unpublished.
- „Default Access“: The default Joomla!® Access group under wich the record/article should be created with.
- „Default Featured“: Should the associated article be featured (frontpage in J! 1.5)?
- „Auto Publish“: Should the record/article be published right away?
- „Create Sample“: Will create sample code – just once - with all field tags (labels and items). The sample code is provided by the selected theme plugin, defined in the view tab. By default it will use the „khepri“ based theme for content and forms. So it should be installed and enabled, otherwise no sample would be created.
- „Content Prepare“: Here you may enter php code to override the output of each field. The structure is:
-
$items["ITEMNAME"]["value"] = "".$items["ITEMNAME"]["value"]."";
$items["ITEMNAME"]["label"] = "".$items["ITEMNAME"]["label"]."";
- Note that this code will be only executed once for articles, so you shouldn't use php code here that pulls data from url requests (if you are using article creation). For list details, the code will be executed every time on accessing the details page.
- „Editable Template“: Here you have only one option - to create an editable sample. On sample creation, it will generate all necessary html code to display a form. You may adjust the code to create custom layouts, while the selected theme plugin serves the stylesheets. The sample code is provided by the selected theme plugin, defined in the view tab. This option is not available when „edit by type“ is enabled (for example is BreezingForms is in use).
- „Editable Prepare“: Same as „Content Prepare“, except that it will be applied on the values and labels of the editable form. This option is not available when „edit by type“ is enabled (for example is BreezingForms is in use).
- „Email Templates“: Here you may define define settings for emails that are sent on record/content submission – one for the user and one for administrative purposes.
The available options for each Email setup are - „Subject“: a subject for the email to be sent. You may use values from the submission if you add variables in the form {FIELDNAME} into the subject. For example „Hallo administrator, {firstname} {lastname} sent you a message“, would show the subject with the first- and lastname from the submission.
- „From Email (alt)“: an alternative reply-to address
- „From Name (alt)“: an alternative sender name
- „Recipient(s)“: all addresses that should reveive a copy of the email, seperated by semicolon. Just like in „Subject“, you may use variables. For example, if you have a field called „email“, this recipients setup would send it to the address from the submission + to the specified fixed email address: „{email};info@crosstec.org“
- „Attach Uploads“: specify all upload fields as variable here if you want them to be attached with the email. Example: „{picture1};{picture2}“ would attach uploads from these 2 fields into the email.
- „Is HTML“: send the email as html?
- „Create Sample“: check and save if you want to create an example based on the settings above. The sample may be edited at any time to fit your needs.
- „Permissions“: Set user and group based permissions for this view. The permissions are divided into 3 tabs:
- „Users“: this tab gives you the ability to limit certain activities to users / user groups or altering the behaviour of the view.
- „Act As Profile“: if enabled, then your view, will act as user profile, including registration. Means, if no profile exists for the current user, it will start a registration process, else it will display the data and offers editing. If enabled, the registration form will be provided by the built-in form editor. This feature won't (yet) be available for 3rd party form builders like BreezingForms.
You will have to choose fields that should act as name, username, email and password (including repeat) and assign it to the profile setup. All fields have to be assigned, otherwise the profiling won't work. - „Force Login After Submission“: if enabled, the form will redirect to login after submission. If the user is already logged in, it will redirect to user area of Joomla!®.
- „Force URL After Submission“: if a url is given – and force login is not enabled – then it will redirect to this url, right after submission.
- „Verify Registration Plugin (optional)“: here you may choose a verification plugin that connects between registration and user activation by email. Means, when the user gets his registration email and clicking on the activation link, the selected verification plugin will take over the verification.
For instance, the paypal plugin would redirect to a payment first and once the payment has been done, it will activate the user account – but not before.
The „passtrough“ plugin won't do anything but will allow you to use the registration from this view, having the Joomla!® registration turned off. Combined with the Captcha, this will help to keep bots from your site. - „Verification Name (optional)“: a descriptive name for the verification. If not given, it will use the view's name. The name will appear for instance in the paypal item name on payment if using the paypal plugin.
- „Verify View (optional)“: the id of a view you want to verify (may be the same that you are working on or some other view). Since you can set certain view actions like „view“, „new“ and „edit“ to require a verification, this would set the verification state of the choosen view to „true“. What actions should then be verified have to be defined in the plugin params.
- „Plugin Params“: some selected plugins may accept parameters to define how they should behave. Please read the documentation of the plugin you choose in order to use its parameters here.
Though there are parameters to address the selected plugin, you additionally may use ContentBuilder parameters that will tell the verification how to behave. They are meta-parameters and don't interfere with the plugin itself but helping the verification to know what to do before or after a successfull verification. Available parameters are: - verification-msg
- verify-levels
- require-view
- return-admin
- return-site
- Here is an example for the usage of plugin params for verifications (non-plugin specific):
require-view: 18;
verify-levels: view, new, edit;
verification-msg: Your account has been successfully verified;
return-admin: index.php;
return-site: index.php;
more plugin specific params (plugin specific), for example paypal:
locale: en;
currency-code: USD;
tax: 0;
use-ipn: true;
item-number: 1;
cancel-url: http://domain.com/payment-cancelled.html- This example would force the user to fill in a form from the view with ID „18“, then verifying the actions „view“, „new“ and „edit“ for the current view, display a message after verification and returning to the selected url – one for admin and one for the site users – after the registration has been verified.
The other sample parameters are plugin specific and will come into action before the verification does.
If you leave out the return option, the verification will try to redirect to the record list of that view. If you set the permissions to disallow list views for unregistered users, leaving out the return urls, might lead to a 403 forbidden error. So always keep the permissions in mind when doing the verification setup. - „Submission Limit“: the total maximum amount of submissions a user is allowed for this view.
- „Edit Limit Per Submission“: total maximum amount of edit attempts for a record in this view.
- „View“, „New“, „Edit“: here you may define what level requires a verification. The verifications can be done manually under „Users“ or using a verification plugin as described above.
With „Days“ you specifiy the absolute amount of days a verification will be valid. A zero means unlimited.
By „Url“ you may specify an alternative URL if a user is entering a restricted area that requires verification. You may use this to point to a page that should describe why entering is restricted and how to gain permission (for example through payment). - „Users“: by clicking on „edit“ you are able to browse through the site's userlist and set verification levels for certain users in this view (verified and date of verification). There you also may override the submission and edit limit for each user. The „published“ option will immediately block the user for this view. No matter what permissions you will set, the user will be restricted from anything.
- „Backend“: by this tab you control the permissions for this view if it is accessed from the backend (and if defined as backend view, of course).
- „List Own Only“: if checked, only records of the current user will be shown in the list.
- „Limited Article Options“: if changing the article options is granted, unchecking this will provide even more options to adjust the article behind a record (just like in the Joomla!® Backend)
- „Force permissions on owner“: as soon as at least one of the options is checked, the user may only access and edit his very own records under the given permissions, ignoring the ones that are defined for user groups.
- User group based permissions: if permissions are not forced on owner, the permission matrix will be used instead. Here you may grant access to all available site's user groups for the following actions:
- „List Access“: grant access to view the list provided by the view.
- „View“: allow to view a record. The same rule will apply to generated articles – not just the details from a list.
- „New“: allow to add new records.
- „Edit“: allow to edit records.
- „Delete“: allow record deletion.
- „Edit State“: allow to trigger a state change. Here we don't mean publish/unpublish! (see List Actions above)
- „Publish“: allow to publish/unpublish records.
- „Article Settings“: allow to edit the settings of the article behind this record.
- „Change Language“: allow to edit the language for the record.
- Note that the permissions are not based on inheritance. If you allow a certain group to add and edit new records, it doesn't automatically allow the same for higher groups. Instead, choose exactly the groups you want the permissions to be applied to. This gives you a clear overview about your settings, preventing unnecessary inheritance confusion.
- The permission settings may have an impact on the list. For example, if you add a publish state column to the list and disable „Publish“ permissions, the publish/unpublish action will disappear from the list.
- The default permissions on view creation are „List Access“ and „View“ across all groups. Please keep that in mind if you create a new view