")


You will see that the QuickMode screen is comprised of two areas. On the left side, you can add new pages, sections and elements, while on the right side you have access to numerous form and element properties.
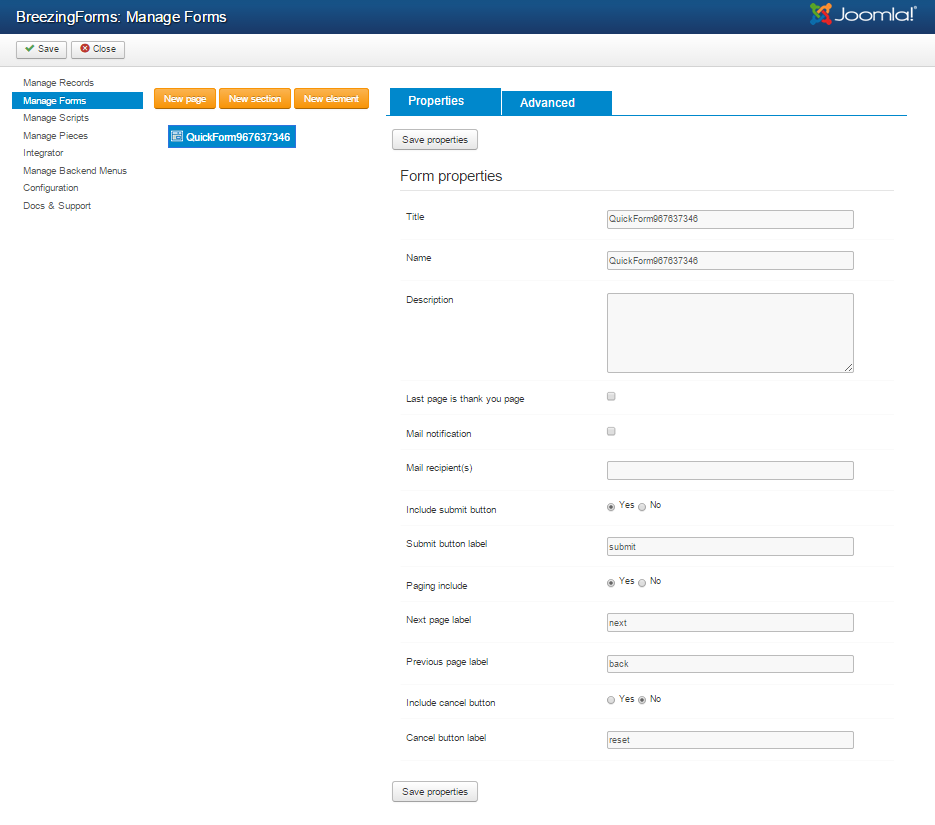
- Title
QuickMode will generate a Title for the form automatically. You can change the title at any time under the Form properties. In the example shown above, the form Title is "My First Form." - Name
QuickMode will generate a Name for the form automatically. You can change the name at any time under the Form properties. In the example shown above, the form Name is "myfirstform." Important: The form's "Name" field provides a way to reference the form in a script and in the Joomla! component itself. We therefore recommend that you avoid using special characters and/or blank spaces in the form name. - Description
Enter a short description about your form. This will appear in your list of forms on the Manage Forms screen. - Last Page is Thank You Page
If you check this option, your form page will refresh and the respondent will see a Thank You message on the page indicating that their form has been submitted. (If you would like to redirect a respondent to a completely different URL, please click here for instructions on how to do that.) - Mail Notification
If you want to send a copy of the form results to an Email address, then please check the box for Mail Notification. - Mail Recipient(s)
If you want to send a copy of the form results to an Email address (or multiple Email addresses) other than the default Email address that you entered on the configuration form, then enter it here. To enter multiple Email addresses, please use the format below:
EmailAddress1@mycompany.com;EmailAddress2@mycompany.com;EmailAddress3@mycompany.com
- Include Submit Button
If you want to include a 'Submit' button at the bottom of your form, please choose "Yes" here. - Submit Button Label
If you are using the default 'Submit' button for your form (rather than one using a custom graphic), you can choose to label it whatever you want. (e.g. "Send It!" or "Enter Me Now!") To change the button's label, just type the alternate text you wish to use in this field. - Paging Include
If your form consists of multiple pages, you can choose to add a 'Next' and/or 'Back' label, as applicable, to each page. To do so, choose "Yes" here. If your form is only one page long, you can disregard the settings - the labels will only appear on a multi-page form. - Include Cancel Button
If you want to include a 'Cancel' button at the bottom of your form, please choose "Yes" here. (If you would prefer to include a 'Cancel' button that uses a custom graphic, please click here for instructions on how to do so.) - Cancel Button Label
If you are using the default 'Cancel' button for your form (rather than one using a custom graphic), you can choose to label it whatever you want. (e.g. "Cancel" or "Clear Form") To change the button's label, just type the alternate text you wish to use in this field. - Save Properties
Once you have filled in the necessary fields on the Properties tab, click the "Save Properties" button located at both the top and bottom of the screen. - Save Form
Important: The "Save Properties" button only saves the parameters of the form tab that you are on. IT DOES NOT SAVE THE FORM ITSELF. To save the form, click on the "Save" icon in the upper right-hand corner of the page