")


In this tutorial you'll learn how to create a simple multiple-page form with BreezingForms for WordPress®.
Content:
1 – LOG IN INTO YOUR WORDPRESS ACCOUNT
4 – CREATING THE FORM STRUCTURE
6 – DEFINING REQUIRED FORM ELEMENTS
8 – PUBLISHING THE FORM IN THE FRONTEND
1 – LOG IN INTO YOUR WORDPRESS ACCOUNT
Log into your WordPress® account and open BreezingForms from the left admin sidebar.
2 – WORKSPACE
On the Manage Forms screen, click on the button new in the upper right.
The workspace is composed of two areas:
On the left side, you can add new pages, sections and elements.
On the right side you have access to numerous form and element properties.
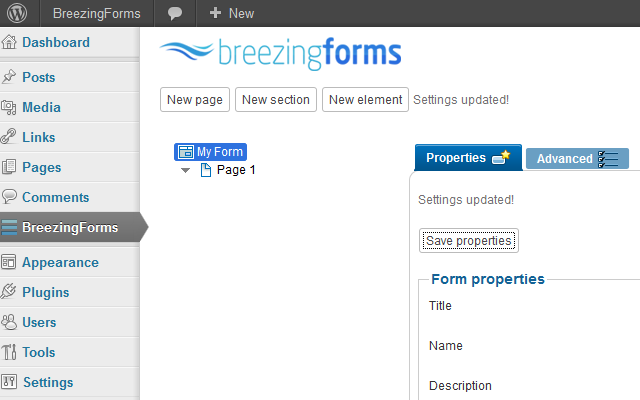
3 – ASSIGNING FIELD NAMES
BreezingForms auto generates a title and name for the form. Those attributes can be changed anytime under Form properties. In this example, the form title is “My Form” and the form name “myForm”.
Important: The form name field provides a way to reference the form in a script and in the WordPress plugin. It's recommended to avoid special characters, as well as blank spaces.
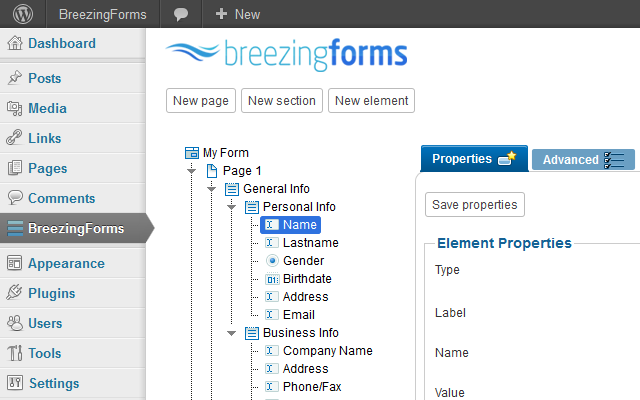
4 – Creating the form structure
4.1 – The basic structure of a form built in BreezingForms consists of:
Page, Sections and Elements
Pages are necessary in order to hold sections and elements in a form and also make pagination possible.
Sections, while optional, are used to logically group together elements in a form. Sections can be displayed as Fieldsets with legends or plain (no legends and borders).
Elements allow the user to enter information (like text fields, textarea fields, drop-down menus, radio buttons, checkboxes, etc.) in a form. Additionally, elements provide special integration with PayPal (PayPal button), Calendar, etc.
4.2 – Create a page by clicking on the button New Page located at the top left corner of the workspace.
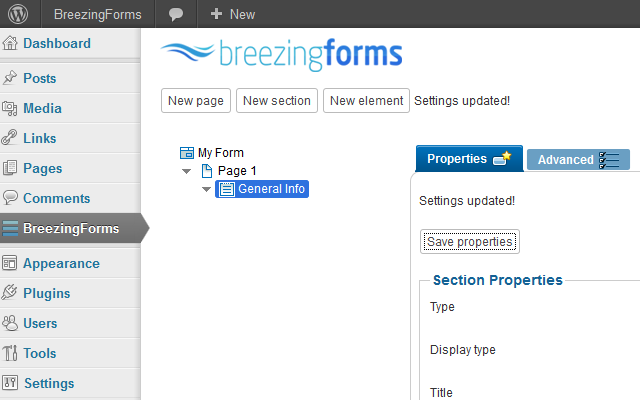
4.3 – Create a section on the recently added page by clicking on the button New Section.
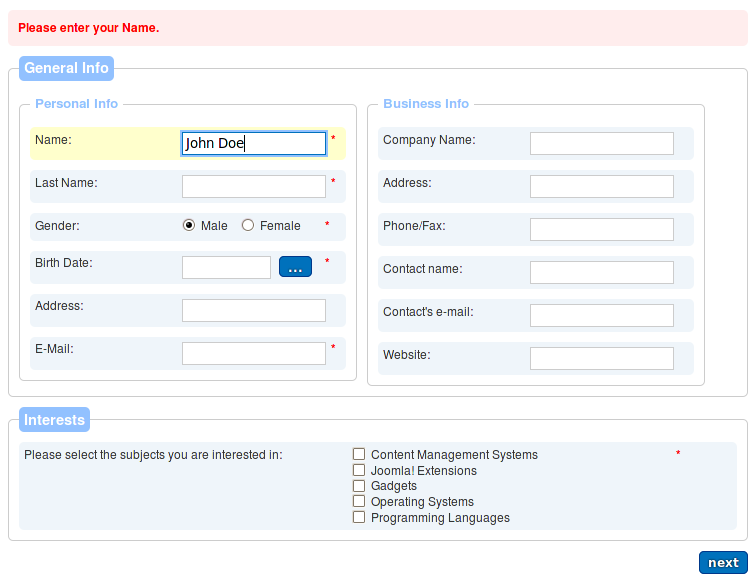
In the example, the type of section chosen is Fieldset, the Display type All in a row and for the Title “General Info”.
Click on the button Save Properties.
4.4 – Create two new sections inside “General Info”. To do so, select “General Info” in the tree on the left side and click on the button New Section.
For both sections, choose Fieldset for the section type and Wrap after each element for the Display type.
The new sections received the titles “Personal Info” and “Business info” respectively.
Click on the button Save Properties.
4.5 – Create another section, this time, outside “General Info” by selecting Page 1 and clicking on the button New Section. Set the section properties to Type Fieldset, Display type Wrap after each element and for the title enter “Interests”, then click on Save Properties.
4.6 – Page 1 structure complete, let's now add a second page to the form. Select “My Form” in the tree and click on the button New Page.
4.7 – With Page 2 selected, add a Section called “Feedback”, and choose Fieldset for Type and Wrap after each element for Display type. Click on Save Properties.
Form structure complete, click on the button Save located at the top right corner.

5 – Adding elements
Adding elements in BreezingForms is very easy. To add an element simply select the desired page or section and click on the button New Element.
When an element is added, it will automatically have a Label attached to it. The attribute Name will also be assigned on the fly. You can change an element's properties by selecting it and under Element Properties make the necessary changes.
The table below shows a list of elements that will be added to the form sample and their respective sections and pages:
| Page | Section | Element Type | Label | Name |
| Page 1 | Personal Info | Textfield | Name: | name |
| Textfield | Last Name: | last_name | ||
| Radio Group | Gender: | gender | ||
| Calendar | Birth Date: | birth_date | ||
| Textfield | Address: | personal_address | ||
| Textfield | E-mail: | personal_email | ||
| Business Info | Textfield | Company Name: | company_name | |
| Textfield | Address: | company_address | ||
| Textfield | Phone/Fax: | company_phone | ||
| Textfield | Contact name: | contact_name | ||
| Textfield | Contact's e-mail: | contact_email | ||
| Textfield | Website: | website | ||
| Interests | Checkbox Group | Please select the subjects you are interested in: | interests | |
| Page 2 | Feedback | Textarea | Tell us what you think of our products: | feedback |
Complete Form structure with elements:
6 – Defining required form elements
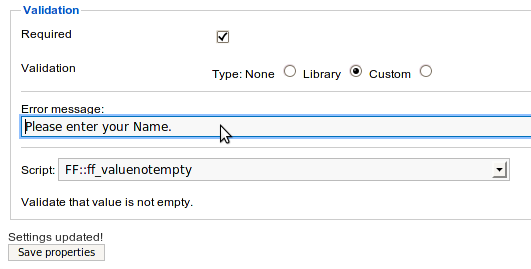
To define required form elements, simply select the desired element and under Validation, check the option Required and in Validation type, choose Library, select the appropriate validation script and enter an Error Message.
Each validation script has a description of its function displayed below the select box Script.
Required form elements are indicated by a red asterisk * in the frontend.
7 – Thank you page
To create a Thank You page, select your form in the tree, click on the button New Page. Select the added page in the tree and under Page Properties, click on Edit to add a message.
Sample message:
Thank you for contacting us. We will get back to you shortly.
Click on Save and Save properties respectively.
Message added, go to Form Properties and check the option Last page is thank you page. Click on Save properties and then Save, to save all changes.
8 – Publishing the form in the frontend
The last step is to make your form available to users on your website.
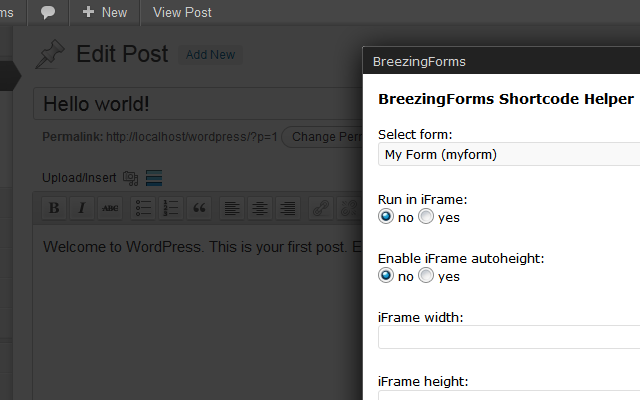
Open your post or page and click on the icon on top-left of the text editor (the icon with the 3 blue lines).
This will open the BreezingForms Shortcode Helper.
Select the form "My Form" and click Add Shortcode.
The overall appearance of a form can be changed with themes. BreezingForms provides a clean, customizable theme called "qmtheme" that can be found on the tab Advanced, under Other Options > Theme.
Well done! You have created you first multiple-page form with BreezingForms.