How and where can I configure my mailback emails? I can't find any options.
In Quickmode go to Form properties->advanced->more options.
In Easymode open your form and click "Form Settings" in the top menu.
In Classicmode click "Edit Form" in the top menu.
The screen for Mailback Emails is almost identical to the one for Admin Emails. The only difference is that the Email Address dropdown and "Email To" textfield are not included.
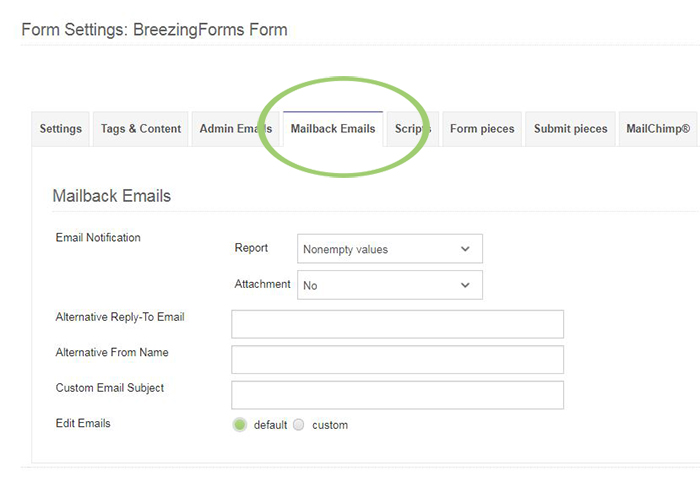
Email Notification - Report
In the Mailback Email that is sent, you can choose to report (send) the following data:
- Header only - will only send the header data
- Nonempty values - will send data from all fields which were completed, but will not send data from fields that were left empty.
- All values - will send data from all form fields, whether completed or not.
Attachment
You can choose whether to send an attachment with the Mailback Email. The options are:
- No - do not send attachment
- XML - send form data in XML format
- CSV - send form data in CSV format
- PDF - send form data in PDF format
Alternative From Email / Alternative From Name
By default, BreezingForms uses the Email address and name defined in your Joomla global configuration settings as the 'From' name/address for form emails. There may be times, however, when you want the 'From' field to show a different name and/or Email address. If so, you can specify those here.
Custom Email Subject
If you want the Mailback Email to have a custom subject that will appear in every Email sent for this form, you can define it in this field.
Edit Emails
- Default - uses the default Email template (or custom template if you have created one) as described in this section of the online dokumentation:
Email Templates
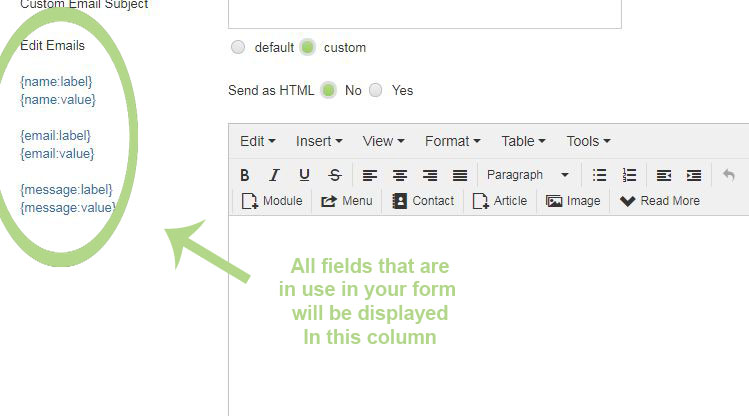
- Custom - This is a new feature in BreezingForms 1.7.3. You can now create a quick Email template using a simple tagging system. When you click on the 'Custom' button, a new section will appear, as follows:
Click on one of the bracketed links in the left-hand column, and it will then be displayed in the textboxon the right. Within that textbox, you can manipulate the layout as you wish.
If you choose the YES button to send as HTML, then you can wrap the labels and values within paragraphs, use different fonts and colors, etc. (In fact, if you specify that it should be sent as HTML but don't use HTML tags in the message, the Email sent will be displayed without linebreaks or other formatting.)
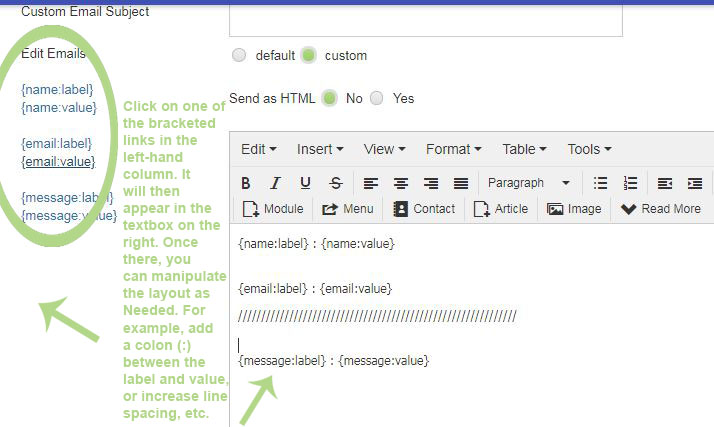
If you choose the NO button, the Email will be sent in plain-text format, and the layout that you create will be retained in the Email, including whatever linebreaks you might include.
Once you have made the necessary changes, scroll down to the bottom of the frame and click on the SAVE button. You will then be returned to the main form screen.
Finally, click the SAVE button in the upper right-hand corner of the screen to ensure that your changes are saved.


