")


Setting up sales taxes is an important task in every online store, so it is in BreezingCommerce. By default, there are tax classes and tax rates pre-defined for every European Union country but in order to activate the tax rates that apply for your store, you will need to know how to do things.
Content:
6 - EXAMPLE 1: SIMPLE SALES TAX
7 - EXAMPLE 2: VIRTUAL GOODS TAXATION FOR EUROPEAN UNION STORES
8 - EXAMPLE 3: VIRTUAL GOODS TAXATION FOR EUROPEAN UNION STORES / AUTOMATIC USER LOCATION
In this tutorial we'll explain the use of the tax section and 3 different examples of sales tax rules
- Explaining the different tax options
- Example for simple taxing for an online store with the same sales tax rates for every buyer, no matter where they are originating from (e.g. Germany 19% and 7% rates)
- More complex example on taxing, targeting the sales tax of the buyer's origin country (e.g. EU Vat on virtual goods)
- For users of the full version, only: A special case of point 2., where the buyer's origin will be determined by a user location plugin (using Maxmind as reference BC Plugin, could be any other userlocation BC Plugin)
1 - The Taxes Section
After entering the taxes section in BreezingCommerce, you'll see a little dashboard with tax stats, as well as 4 options at the top navigation bar:
- Edit Rates: Rates that might apply in your store
- Edit Customer Tax Classes: Tax classes that may be associated with a customer or customer groups
- Edit Product Tax Classes: Tax classes for your product
- Edit Tax Rules: Setting up rules that define what tax rates should apply for what combinations of customer and product tax classes
2 - Edit Rates
When entering the Rates area, you'll see a pre-defined list of rates for your convenience. For example EU countries if you are selling virtual goods and your business is located within the EU.
However, you might still need to setup your tax rates matching the requirements of your store's origin country, e.g. the United States.
There is also a pre-defined rate for shipping, that could be useful with the Flatrate Shipping BC Plugin.
In case that you need only one sales tax, setting up the default one would already be enough. The use of more than one sales tax is explained in Example 1, which follows a bit later within this tutorial.
The list of available taxes is showing you the basic setup information for each tax rate:
- The name of the tax, which will be displayed in the store front. If you are running a non-multilanguage and non-english website, you might want to edit the name matching your website's language. In multilanguage websites, the name can be translated.
- The country, region and zip codes that these taxes should be applied on.
- The rate in percent
- The sort order in which the rates should appear in the store front (e.g. in the cart)
- The published state of the tax rate
Let's create a new tax rate by clicking "New" in the upper menu and note the available options:
- Name: mandatory, the name of the tax rate.
- Country: The country this tax rate should be applied for. Set to 'none' if it's a global tax or a country if it should apply only for this country. Setting it to None, it will be applied for ALL the countries.
- Region: The region of the selected country. Could be set to '*' for any region or a specific region, such that the tax rate will only be applied to the pair of country / region as defined.
- Is Range: If set to 'yes' you may enter from what zip code to what zip code this tax rate should apply. If set to yes, then an exact match of zip code will apply. Here you may additionally add a '*' as wildcard to match num-numeric zip codes.
- Rate Percent: The sales tax rate in percent
Save the tax rate and publish it and you should see it unpublished in the list of tax rates. Publish the rate to use it. Concrete examples on how to use the rate are explained below.
3 - Edit Customer Tax Classes
The custom tax classes provide a simple list with the names of the available tax classes, their sort orders as they are supposed to appear in the select lists of the administration and their publish states.
When creating or editing a customer tax class, you just need to enter its name. They are selected in other parts of the store (and might be required) for example when editing a customer or specifying a customer group under Customers => Edit Groups.
4 - Edit Product Tax Classes
Works in the same way like the customer tax classes except that these are used for products. E.g. in the product configuration when choosing the product tax class from the tax classes list.
5 - Edit Tax Rules
This is the most important part in the tax section. Here everything comes together what you specified in the tax rates and customer/product tax classes.
As you can see in the list of available tax rules, there are also pre-defined rules that might apply depending on what type of store you're running.
- Name: The name of the tax rule, won't show up in the frontend but helps you to organize your rules
- Customer Tax Classes: All tax classes that should match for this rule before it fires
- Product Tax Classes: All product tax classes that should match for this rule before it fires
- Tax Rates: All tax rates that should be applied if a cart item meets the defined customer and product tax classes
- Priority: If more than 1 rule will be fired, the priority specified which should be applied first. Priorities with equal values will be compounded.
- Sort Order: Helps you to organize your tax rules
- Published: The published state of your rules
Creating or editing a tax rule works like this:
- Select the customer tax class(es) that this rule should be applied on
- Select the product tax class(es) that this rule should be applied on
- Select the tax rate(s) that should be applied if this rule fires, based on the matching customer AND product tax classes
- Edit the priority if more than one rule fires. The ones firing with lower values will be executed first, same values will be compounded.
- Save your tax rule
- Publish your tax rule
- Repeat the steps above for all tax rules as desired
6 - Example 1: Simple Sales Tax
As mentioned in the beginning, this example is about simple taxing for an online store with the same sales tax rates for every buyer, no matter where they are originating from
The following tax will be applied for Germany with sales tax rates of 19% and 7%. The example could be applied to any online store located in a country that has a similar sales tax structure.
- In the main taxes section, click on "Edit Tax Rates" in the top menubar.
- Unpublish or remove all existing tax rates as you won't need them for this example.
- Create a new tax rate by clicking "New" in the top menubar.
- Add the tax rate name "Mwst. 19%" (the german term for VAT 19%)
- Leave country to 'none' as it will be applied to everybody
- Leave the ranges options as they are
- Enter 19 into the "Rate Percent" field
- Save the tax rate and publish
- Create a another new tax rate the same way with the name "Mwst. 7%" and 7 in the "Rate Percent" field. Then save and publish.
- Leave the Tax Rates options and from the tax dashboard head over to "Edit Customer Tax Classes".
- There delete or unpublish all tax classes except of "Default customer taxclass" (we will need that tax class later).
- Leave the customer tax classes options and from the tax dashboard go to "Edit Product Tax Classes".
- Unpublish or delete the tax class "EU Vat File Purchase". Leave the other tax classes as we need them later.
- Rename the tax class with the name "default product taxclass".
- Add another tax class and give it the name "alternative product taxclass".
- Head over to "Edit Tax Rules" from the tax dashboard and delete or unpublish the existing tax rules
- Click on "New" in the top menubar.
- As name add "Rule 19%".
- Choose "Default customer taxclass" mentioned in point 11.
- Choose "default product taxclass" mentioned in point 14.
- Choose the tax rate "Mwst. 19%" mentioned in point 4.
- Leave priority to 0.
- Save and publish
- Repeat steps 17. to 23. but use the name "Rule 7%" and instead of choosing "default product taxclass", choose "alternative product taxclass".
We finally need to address the above rules in the customer groups, where will only need one (the default customer group), that every customer will be associated with.
In order to achieve that do the following:
- Open the "Customers" section from the left main menu bar and click on "Edit Groups" from the top menubar.
- Delete or unpublish all groups except the default one.
- Enter the default group and choose "Germany" as country (they will be all treated as "German" origin by default, but that won't affect their address settings)
- Choose "default customer taxclass" and leave the other settings as they are.
Now we have specified all the necessary tax rates, classes, rules and customer groups that we need to perform taxing on the items of a cart.
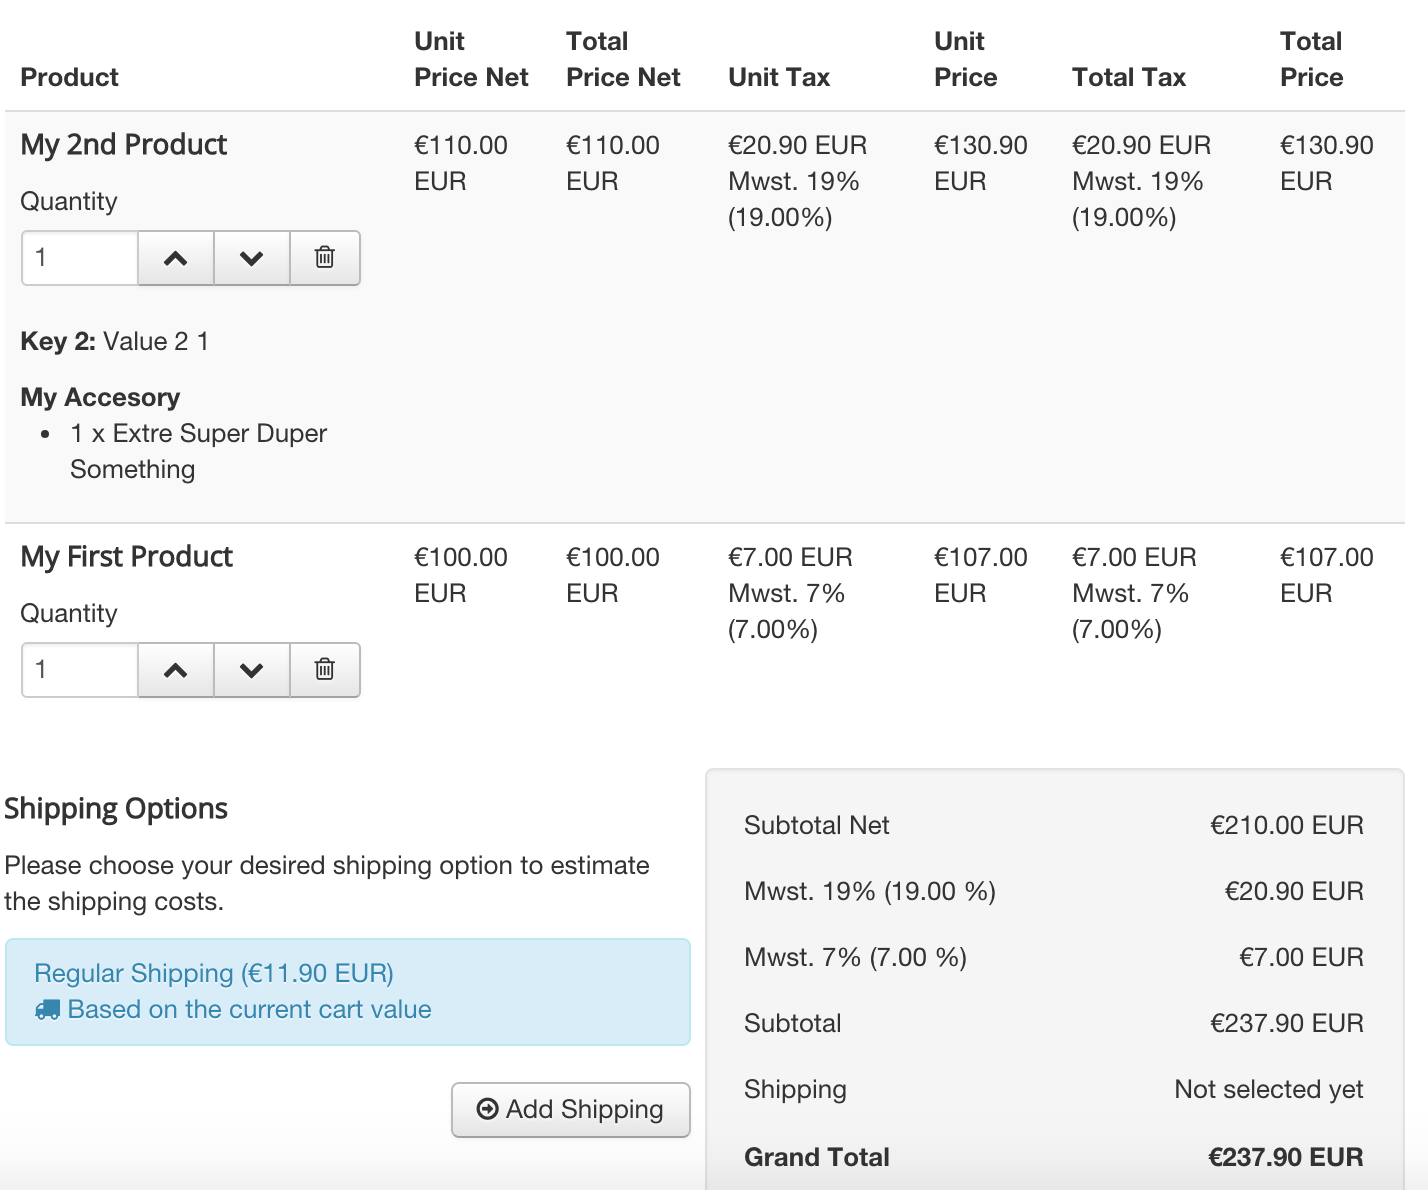
To test it, create a product with the tax class "default product taxclass" and another one with the "alternative product taxclass". You may want to check our introduction article and tutorial video on how to create products.
Then do a test buy in your store front with both products and you should see the correct taxes applied in your cart, similar to the screenshot below:
7 - Example 2: Virtual Goods Taxation for European Union Stores
Since January 1st, 2015, online stores that sell virtual goods like downloads have to collect the sales tax of the buyer's origin country instead of the sales tax of the store's origin country.
Since BreezingCommerce ships with all pre-defined tax rates, classes, rules and customer groups. The only thing you will need to do is choosing the "EU Vat File Purchase" product tax class when creating a product that is a "Virtual product" as specified in the product settings.
At first, the customer will see the sales taxes applied to the default customer group, but as soon as he enters his billing or shipping address, the taxes will be re-calculated, the change in the cart will be alerted and he the buyer can check the applied sales tax in the checkout's overview.
You can specify if the sales tax should applied on either the customer's group, his billing address or his shipping address in BreezingCommerce's Configuration section.
8 - Example 3: Virtual Goods Taxation for European Union Stores / Automatic User Location
The outcome of example 2 is acceptable but it has one drawback: a potential buyer won't see his end-price right from first entering the store and might get irritated of changing taxes and thus the end-price. This could lead to drops in sales.
But we are able to prevent this.
BreezingCommerce ships with the ability to automatically determine a visitor's location through the BC Plugin type "userlocation". Our reference implementation of such a BC Plugin is the "Maxmind" BC Plugin which makes use of the well known Maxmind.com. The service costs money but they are very accurate, fast and it's in fact not expensive as BreezingCommerce automatically filters out bots before a request is being sent to a user location service.
To set it up, please follow these steps:
- Register at Maxmind.com and get your User-ID and API-Key.
- Install the Maxmind BC Plugin that ships with BreezingCommerce Full
- In the Maxmind settings, add your User-ID and API-Key and a test IP with an IP address that you know is for sure associated with a EU country (for testing purposes)
- Publish the plugin
- In BreezingCommerce => Configuration => Products Tab => set "Location based tax rules" to "Yes"
- In the "Misc" tab, set "Enable location services" to "yes".
- Test your store front and you should see the tax for the test IP's location
- If everything works well, wipe the Test IP from the Maxmind settings to go live
Note on testing this: once a vistor's location has been determined already, the plugin won't fire any longer but stores the location in the session of the visitor. The visitor will also be pre-assigned to the corresponding Customer Group. This means for testing: if you already are logged in, you might be already associated with a customer group and this could lead to false negatives. So make sure you aren't logged in when testing and wipe your browser cache on every test.
We hope we were able to give you some insight into the taxation possibilities of BreezingCommerce. Further questions we'd love to answer in our support forums.