")


You might already know that since Joomla! 3.1 tagging is available for your favorite CMS. The special thing about tagging in Joomla! is that you can tag content of different content types such as articles, categories, contacts and display all the content at one spot. So you can easily create mashups from different content providers and display them as you wish (a good strategy for mashups would be a template override for the tagged items template).
However, Joomla! didn't let us down and provides us a way to integrate 3rd party extensions into its tagging system.
BreezingForms takes advantage of tagging starting from version 1.8.3 and integrates nicely into Joomla!'s tagging system.
We also created a video tutorial on vimeo that might be interesting for you if you want to get into BreezingForms tagging. Below is the textual how to, if you would like to go more into details:
BreezingForms & Joomla Tags from Crosstec on Youtube.
Tagging for BreezingForms ships in 2 distinct flavors:
- Form Tagging: tag your forms and display them for example in a tagged items list
- Content Tagging: tag your form's submissions and display them as tagged articles (or in tagged items lists)
So besides content tagging you also have article creation in BreezingForms. Keep in mind that article creation in BreezingForms tagging is one-way, means you cannot edit the articles through BreezingForms (but through the article manager). If you need record edition in frontend/backend for BreezingForms, I refer to our extension ContentBuilder which provides a tight BreezingForms integration.
What you need for using Joomla! tags in BreezingForms
You basically need at least 3 things, basic knowledge how the tagging works in Joomla! in general, the main component and the main BreezingForms content plugin (plg_breezingforms.zip or plg_breezingforms_joomla*version*.zip).
After installation of the component and the plugin (don't forget to publish the plugin), you need to create a form to be able to get started.
In our how-to, we gonna create a small blog entry form using the QuickMode and display the form and its contents in a tagged items list view.
First, we need to create a tag and a tagged items menu entry, so we will see all the form and its content collected in one view.
In order to do so, in Joomla! backend, please go to Components => Tags => Click "New" => Add the tag title "Blog Entries" => save the tag.
Then go to Menus => Main Menu => click "New" => select "Tags" => choose "Tagged Items" => Type the first 3 letters of "Blog Entries" into the tag field and choose "Article" and "BreezingForms" from the Content Type dropdown. => add a menu item title and save. In your frontend you should now see an empty tagged items list when clicking on "Blog Entries".
Tag your form
Now create a form with the name "blogentry" and title "Blog Entry" using the QuickMode. It would be looking like this:
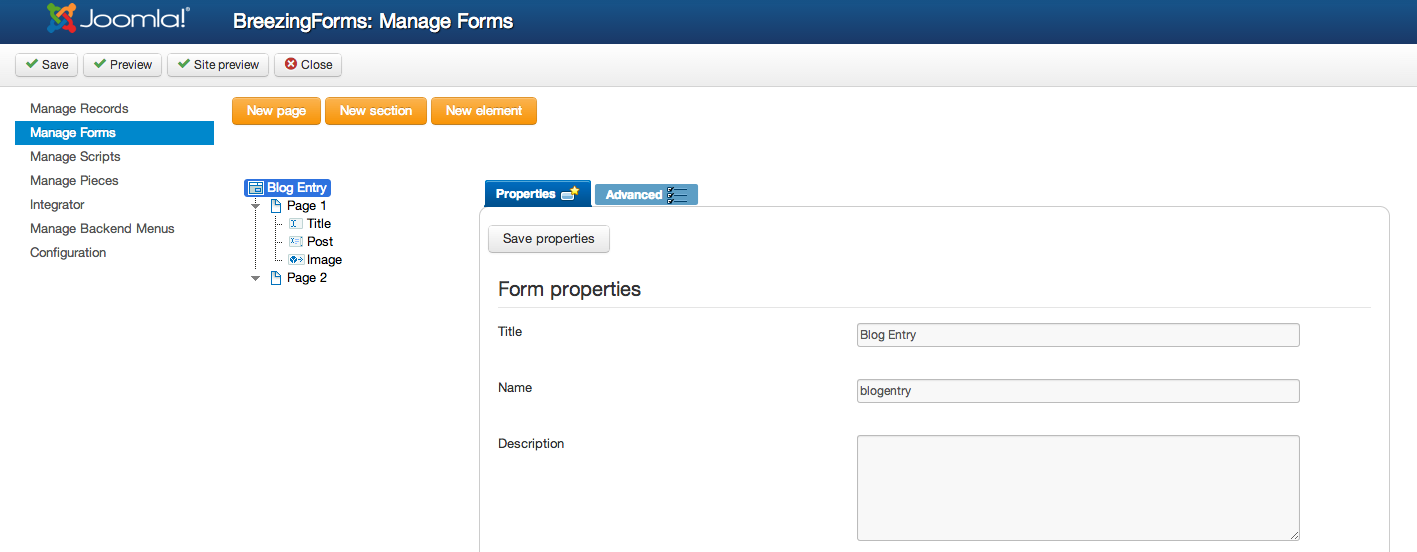
In our example we have 3 form fields. A title, a textarea for the post itself and a file upload field for an image that may be uploaded. Additionally, you can add a 2nd page as thank you page and enter some thank you text (don't forget to check "last page is thank you page" in the form settings). For this example we gonna skip validations, it's just a demonstration.
Now open the form's advanced tab => more options => Tags & Content to see the tagging configuration screen:
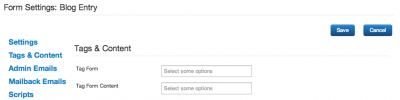
For now we just want to display the form in the tagged items list, so in "Tag Form", enter the first 3 characters from "Blog Entries" and select the tag, then save and head over to your frontend and reload (you might need to reload twice due to some scripts that joomla is loading). You should see something like this:
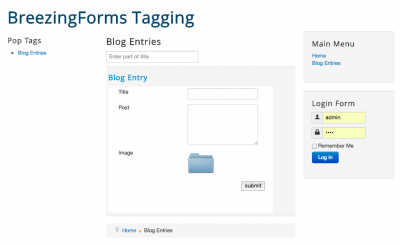
If it shows up, everything went fine, if not, then please check in the menu item if you added the "BreezingForms" content type into your tagged items list.
Tagging form submissions
We now could keep going and add many forms like this and show all of our forms in one page but that's not what we want. What we want is to display the submissions from the form right at the same spot.
In order to do that, please get back to your form's "Tags & Content" tab and enter the first 3 characters of "Blog Entries" into the field "Tag Form Content" and select the tag.
Further down below you see a few options for the tagged content, like this:

There are a few options such as category, access, publish state that you might know from regular article creation already (the work as default options here) but the most important part for now is the Content Template.
Here you can create you own custom HTML based layout. As soon as you have a tag added, it will display the data from your content template. If you leave the template empty, it will use a list style base layout that would display everything.
Also choose a default title element, so that the generated articles will have the right title.
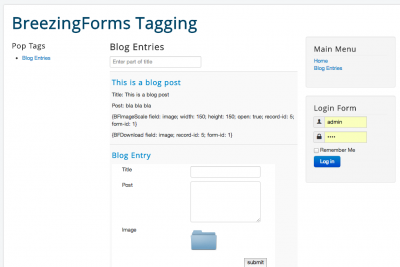
If you now enter something in your form in the frontend and reload the page, it should show your entry like this:
If you would keep going to send new submissions, you would see the list grow. But take care, the default order for tagged items in the menu item is set to order by article. You might want to change that to the creation date or some other default order.
What about uploaded files?
If you did an upload with your posting, you will see the it renders the full path to the file. This is usually not what we'd like to see in our posts. For this case, we created 2 content plugins that you can add into your content template.
For image display (including scaling) this would be the plugin plg_breezingforms_image_scale*jversion*.zip and for downloads it would be plg_breezingforms_download*jversion*.zip.
Both plugins need to be installed and enabled in your extension manager and you'll find them in your breezingforms package.
The usage of these plugins is pretty simple. Let's say you want to display the uploaded image as a thumbnail and clicking on it would display the image in original size, you just need to enter this plugin call in your content template:
{BFImageScale field: image; open: true; width: 150; height: 150;}
Where "image" is the name (not title) of your upload field. If the upload is not displayable, it won't show anything. The plugin also tries to prevent issues with large image files. So every time you don't see nothing (not even the plugin call) in your submission, it means the file was too large, needed to much time to process or simply hasn't been an image file (png, gif or jpeg).
If you don't want to reveal the upload file's path or the upload folder is protected by an .htaccess, you can also add the protect flag, so it will try to deliver the image data though php. The call for this would be:
{BFImageScale field: image; open: true; width: 150; height: 150; protect: true;}
The download plugin call is similiar. Try to add this for example:
{BFDownload field: image}
and it will display a download link with some information about the download.
Both plugins accept the class parameter, that you can use to pass your custom class and style the elements the way you like. The class parameter can be very handy if you want to use a gallery plugin for your uploaded files. Also note that the content template will execute any other content plugin, so get creative.
In the end you should receive results like this in the tagged items list:
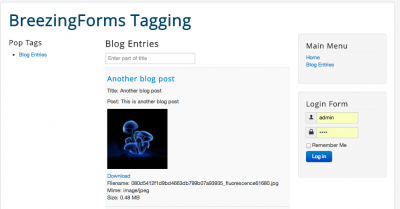
That's basically it with our Joomla! and BreezingForms tagging how-to.
If you would like to use BreezingForms and tagging, you may obtain BreezingForms from here.